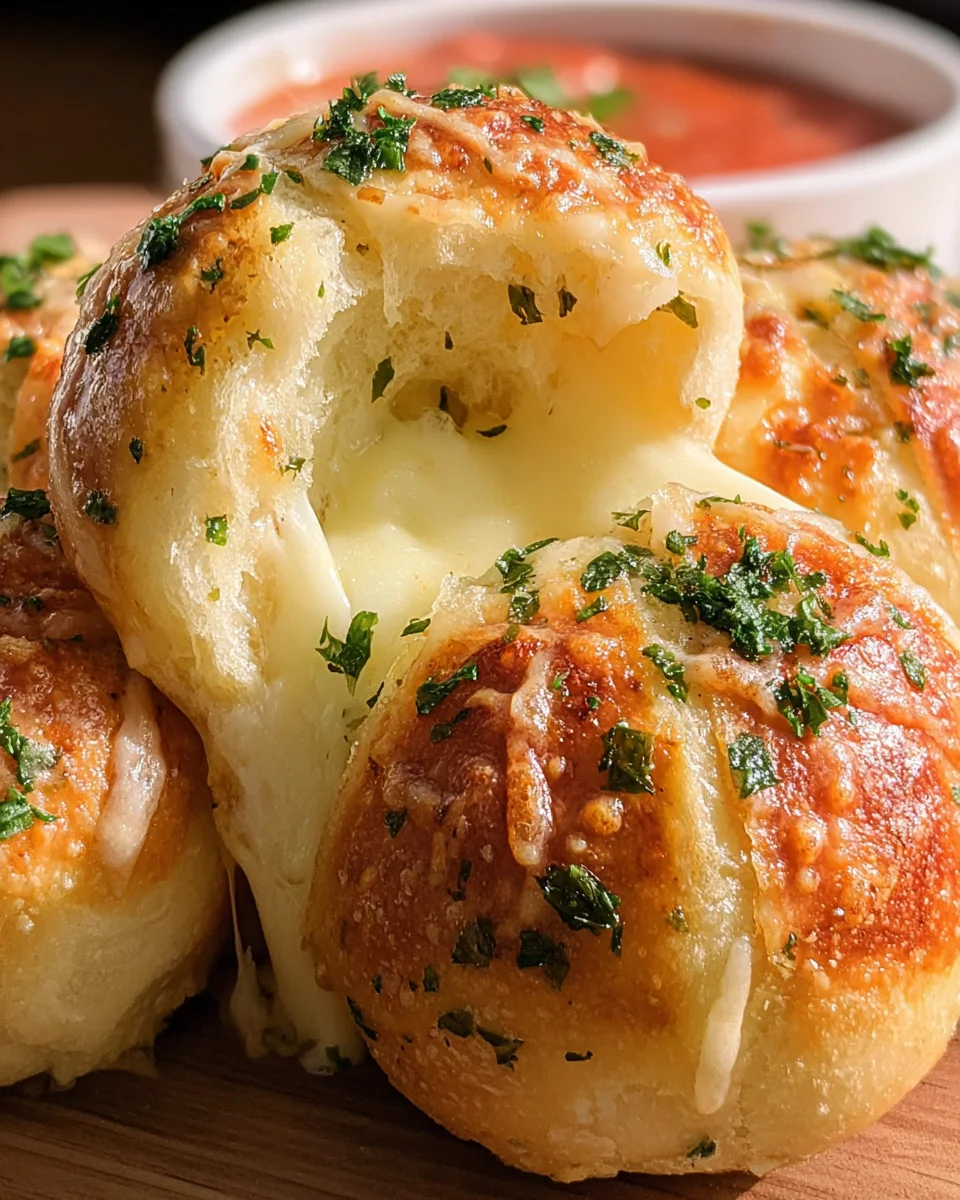
Transforming frozen rolls into Easy Garlic Cheese Bombs is a delightful way to elevate your snack game or impress at dinner gatherings. These cheesy bites are not only quick to prepare but also bursting with flavor, making them perfect for spaghetti nights, parties, or casual family meals. With melty cheese encased in soft bread and brushed with aromatic garlic butter, they are sure to be a hit with everyone.
Why You’ll Love This Recipe
- Quick and Easy: With just a few simple ingredients and minimal prep time, these cheese bombs come together in no time.
- Delicious Flavor: The combination of gooey cheese and rich garlic butter creates an irresistible taste that will leave you wanting more.
- Versatile Snack: Perfect as an appetizer, side dish, or game-day treat, these bites suit any occasion.
- Family-Friendly: Kids and adults alike will adore these cheesy delights, making them a great option for family dinners.
- Customizable: Feel free to experiment with different types of cheese or herbs to make them your own!
Tools and Preparation
Having the right tools can make all the difference when cooking. Here’s what you need for this recipe.
Essential Kitchen Tools
- Baking sheet
- Parchment paper
- Microwave-safe dish (or saucepan)
- Knife
- Cutting board
Why These Tools Matter
- Baking Sheet: A good baking sheet ensures even cooking and browning of your garlic cheese bombs.
- Parchment Paper: This makes cleanup easy and prevents sticking, allowing your bombs to slide off seamlessly.
- Microwave-Safe Dish: This is essential for melting butter quickly and safely without fuss.
Ingredients
Transform freezer rolls into these Easy Garlic Cheese Bombs. Soft bread filled with melty, gooey cheese is baked to golden brown perfection and brushed with garlic butter. Perfect for spaghetti night or just as a snack, the whole family will love these!
For the Rolls
- 8 frozen Texas Rolls (thawed, I like Rhodes brand)
For the Filling
- 4 sticks mozzarella cheese (cut into 16 pieces)
For the Garlic Butter Topping
- 4 tablespoons salted butter (melted)
- 2 cloves garlic (minced)
- 1 tablespoon parsley flakes (freshly chopped or dried)
How to Make Easy Garlic Cheese Bombs
Step 1: Thaw the Rolls
Start by thawing the frozen dough. Place 8 frozen rolls on a plate, cover them with plastic wrap, and move them to the fridge for at least 4 hours or up to overnight. They should double in size.
Step 2: Prepare the Cheese
Once your rolls have defrosted, cut up mozzarella sticks into approximately 1-inch pieces.
Step 3: Preheat the Oven
Preheat your oven to 350° F and line a baking sheet with parchment paper. Set it aside.
Step 4: Assemble the Bombs
Using the palms of your hands, flatten each dough ball into a round disk. Place two pieces of cheese into the center of each disk.
Step 5: Seal the Rolls
Pinch together the edges tightly; you don’t want any cheese escaping! Place them seam side down onto your prepared baking sheet. Repeat until you’ve used all rolls.
Step 6: Bake
Bake for about 9-11 minutes or until they’re just starting to brown.
Step 7: Make Garlic Butter
While the rolls are baking, melt the butter in a microwave-safe dish (or in a saucepan over low heat).
Step 8: Add Garlic and Parsley
Once melted, remove from heat carefully. Stir in minced garlic and parsley flakes until well combined.
Step 9: Brush with Garlic Butter
Once browned, remove the rolls from the oven and evenly brush each one with the garlic butter mixture.
Step 10: Serve and Enjoy
Let cool slightly before serving. Enjoy these cheesy goodness-filled bites warm!
How to Serve Easy Garlic Cheese Bombs
These Easy Garlic Cheese Bombs are versatile and can be enjoyed in many ways. Whether you’re serving them as a snack, appetizer, or side dish, they pair beautifully with various flavors.
As an Appetizer
- Serve warm with marinara sauce for dipping, enhancing the cheesy goodness.
- Pair with a fresh garden salad for a light starter.
With Pasta Dishes
- These cheese bombs complement spaghetti or fettuccine dishes perfectly, soaking up extra sauce.
- Try them alongside a creamy alfredo pasta for a delightful contrast.
During Game Day
- Set them out on a platter during game day gatherings for an irresistible finger food option.
- Offer various dipping sauces like ranch or garlic aioli to elevate the experience.
For Family Movie Night
- Enjoy these cheese bombs while watching your favorite film; they make the perfect cozy snack.
- Pair with popcorn for a fun mix of textures and flavors.
How to Perfect Easy Garlic Cheese Bombs
To ensure your Easy Garlic Cheese Bombs turn out perfectly every time, consider these helpful tips.
- Thaw Properly: Make sure to thaw the rolls overnight in the fridge for optimal texture.
- Seal Well: Pinch the edges tightly to prevent cheese from leaking during baking.
- Use Fresh Ingredients: Fresh garlic and herbs enhance the flavor significantly.
- Monitor Baking Time: Keep an eye on them in the oven; remove when they start to brown for the best results.
- Brush Generously: Don’t hold back on the garlic butter brush; it adds essential flavor.
- Cool Slightly Before Serving: Allow them to cool briefly to avoid burning your mouth on hot cheese!

Best Side Dishes for Easy Garlic Cheese Bombs
These Easy Garlic Cheese Bombs can be paired with several side dishes to create a well-rounded meal. Here are some fantastic suggestions:
- Caesar Salad – Crisp romaine lettuce topped with creamy dressing and croutons complements the richness of the cheese bombs.
- Garlic Roasted Vegetables – A medley of seasonal vegetables roasted with olive oil and garlic adds color and nutrition.
- Tomato Basil Soup – A warm bowl of tomato soup pairs wonderfully, making it perfect for dipping.
- Coleslaw – A crunchy coleslaw adds a refreshing contrast to the cheesy bites.
- Steamed Broccoli – Lightly steamed broccoli provides a nutritious side that balances out the dish’s indulgence.
- Potato Wedges – Crispy potato wedges seasoned with herbs create a satisfying crunch alongside these fluffy rolls.
Common Mistakes to Avoid
When making Easy Garlic Cheese Bombs, it’s easy to overlook some essential steps. Here are common mistakes to avoid for the best results.
- Not Thawing the Dough Properly – Ensure you allow enough time for the rolls to thaw. If they aren’t fully thawed, they won’t rise properly and will be dense.
- Overfilling with Cheese – While it may be tempting to add more cheese, overstuffing can lead to a mess. Stick to the recommended amount so they bake evenly.
- Ignoring Baking Time – Keep an eye on the rolls as they bake. Overbaking can cause them to dry out, while underbaking can leave them doughy.
- Skipping the Garlic Butter – The garlic butter adds essential flavor. Don’t skip this step; it makes all the difference in taste!
- Not Pinching Edges Well – Be sure to pinch the dough tightly around the cheese. This prevents leakage during baking and keeps your cheese bombs intact.
Refrigerator Storage
- Store any leftover Easy Garlic Cheese Bombs in an airtight container in the refrigerator for up to 3 days.
- Ensure they have cooled completely before sealing them to prevent condensation.
Freezing Easy Garlic Cheese Bombs
- To freeze, place uncooked Easy Garlic Cheese Bombs on a baking sheet and freeze until solid. Then, transfer them to a freezer-safe bag or container.
- They can be frozen for up to 2 months before baking.
Reheating Easy Garlic Cheese Bombs
- Oven: Preheat your oven to 350°F (175°C) and warm the cheese bombs for about 10 minutes until heated through.
- Microwave: Heat on a microwave-safe plate for 20-30 seconds. Check for warmth and avoid overheating, which can make them chewy.
- Stovetop: Place them in a skillet over low heat with a lid for about 5 minutes, turning occasionally until warmed through.

Frequently Asked Questions
Can I use different types of cheese for Easy Garlic Cheese Bombs?
Yes! You can experiment with other cheeses like cheddar or pepper jack for a different flavor profile.
How do I make Easy Garlic Cheese Bombs ahead of time?
You can prepare the cheese bombs in advance and freeze them unbaked. Bake from frozen when you’re ready to enjoy!
What dishes pair well with Easy Garlic Cheese Bombs?
These cheese bombs are perfect alongside pasta dishes, soups, or as a standalone snack during movie night.
Can I customize my Easy Garlic Cheese Bombs?
Absolutely! Feel free to add herbs or spices according to your taste preferences. Adding cooked chicken or vegetables is also an option.
Conclusion
Easy Garlic Cheese Bombs are not only delicious but also versatile enough for various occasions. Whether as an appetizer, side dish, or snack, they are sure to please everyone at your table. Don’t hesitate to customize them with your favorite ingredients!

Easy Garlic Cheese Bombs
- Total Time: 21 minutes
- Yield: Serves 8
Description
Easy Garlic Cheese Bombs are an irresistible snack that combines soft, fluffy rolls with gooey, melted cheese and a fragrant garlic butter topping. Perfect for any occasion—from family dinners to game nights—these cheesy bites are simple to prepare and bursting with flavor. Just thaw some frozen rolls, fill them with cheese, and bake until golden brown. Serve them warm for a delightful experience that will leave everyone asking for more.
Ingredients
- 8 frozen Texas Rolls (thawed)
- 4 sticks mozzarella cheese (cut into 16 pieces)
- 4 tablespoons salted butter (melted)
- 2 cloves garlic (minced)
- 1 tablespoon parsley flakes (freshly chopped or dried)
Instructions
- Thaw the frozen rolls by placing them on a plate covered with plastic wrap in the fridge for at least 4 hours or overnight.
- Cut the mozzarella sticks into approximately 1-inch pieces.
- Preheat the oven to 350°F and line a baking sheet with parchment paper.
- Flatten each roll into a round disk and place two cheese pieces in the center.
- Pinch the edges tightly to seal and place seam side down on the baking sheet.
- Bake for about 9-11 minutes, or until lightly browned.
- While baking, melt butter in a microwave-safe dish and stir in minced garlic and parsley.
- Brush each roll with garlic butter once they’re out of the oven.
- Let cool slightly before serving.
- Prep Time: 10 minutes
- Cook Time: 11 minutes
- Category: Appetizer
- Method: Baking
- Cuisine: American
Nutrition
- Serving Size: 1 roll
- Calories: 160
- Sugar: 1g
- Sodium: 250mg
- Fat: 10g
- Saturated Fat: 5g
- Unsaturated Fat: 3g
- Trans Fat: 0g
- Carbohydrates: 15g
- Fiber: 1g
- Protein: 4g
- Cholesterol: 20mg