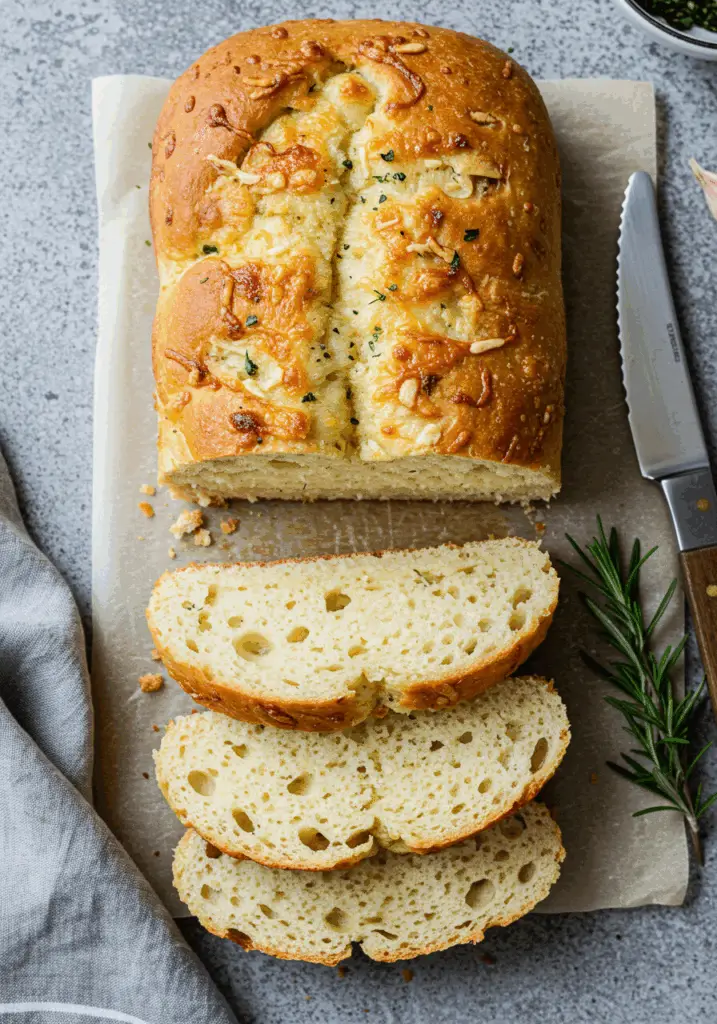
Crusty on the outside, soft and chewy on the inside, this Rustic No Knead Rosemary Garlic Bread is a simple artisan-style loaf that packs big flavor with minimal effort. Infused with fresh rosemary and roasted garlic, it’s perfect for dipping, pairing with soups, or making the best sandwich of your life. And the best part? No kneading required—just mix, rest, and bake!
Want recipes like this delivered straight to your inbox? Subscribe now to get the latest culinary creations you’ll love.
Why You’ll Love This Recipe
No Kneading Needed – Just mix, let it rise, and bake.
Artisan Quality – Golden crust, airy crumb, and savory flavor.
Easy to Make – Minimal ingredients and simple steps.
Incredible Flavor – Fresh rosemary and garlic elevate every bite.
Versatile – Serve with soups, stews, dips, or your favorite spreads.
Ingredients You’ll Need
- 3 cups all-purpose flour
- 1 ½ tsp salt
- ½ tsp instant yeast
- 1 ½ cups warm water
- 1 tbsp olive oil
- 2 tbsp chopped fresh rosemary (or 1 tbsp dried)
- 5 cloves roasted garlic, mashed (or 2 raw cloves, minced)
- Extra flour for dusting
- Cornmeal or parchment for lining the baking surface
Tools You’ll Need
- Large mixing bowl
- Wooden spoon or spatula
- Dutch oven with lid or heavy oven-safe pot
- Parchment paper
- Cooling rack
Step-by-Step Instructions
Step 1: Mix the Dough
- In a large bowl, combine flour, salt, and instant yeast.
- Stir in chopped rosemary and roasted garlic.
- Add warm water and olive oil, then stir with a spoon until a shaggy, sticky dough forms.
- Cover the bowl with plastic wrap or a towel and let it rise at room temperature for 12 to 18 hours, or until doubled in size and bubbly.
Step 2: Shape and Rest
- Flour your hands and a clean surface. Gently turn the dough out and fold it over a couple of times to shape into a rough ball.
- Place the dough onto a piece of parchment paper. Cover with a towel and let it rest for 30 to 60 minutes.
- Meanwhile, place your Dutch oven into the oven and preheat to 450°F (232°C).
Step 3: Bake the Bread
- Carefully remove the hot Dutch oven from the oven.
- Lift the dough using the parchment and place it inside the Dutch oven.
- Cover with lid and bake for 30 minutes.
- Remove lid and bake another 10–15 minutes until golden brown and crusty.
Step 4: Cool and Serve
- Remove the bread and let it cool on a wire rack for at least 20 minutes before slicing.
- Enjoy warm or room temperature with butter, olive oil, or your favorite toppings.
Tips for the Best No Knead Bread
Use Roasted Garlic – Adds sweet, mellow depth (just roast whole heads wrapped in foil at 400°F for 35–40 minutes).
Let the Dough Rest – The longer rise creates better flavor and texture.
Use a Dutch Oven – Traps steam to create that iconic crispy crust.
Dust with Cornmeal – Prevents sticking and adds a rustic finish.
Slice When Cool – Slicing too early can cause a gummy texture.
Serving Suggestions
With Soups – Perfect with tomato, chicken noodle, or creamy potato soups.
As Toast – Top with avocado, jam, or ricotta.
With Cheese Boards – A crusty loaf for spreads and cheese pairings.
For Sandwiches – Make the most flavorful grilled cheese or panini.
Dipped in Olive Oil – Add balsamic vinegar and herbs for a simple starter.
How to Store & Reheat
Storing:
- Room Temp: Keep in a paper bag or wrapped in a towel for up to 2 days.
- Refrigerate: Not recommended—it dries the bread.
- Freeze: Wrap in foil or plastic and freeze for up to 2 months.
Reheating:
- Oven: Warm at 350°F for 10–15 minutes to refresh the crust.
- Toaster: Great for reviving slices for breakfast or snacks.
Frequently Asked Questions
1. Can I use whole wheat flour?
Yes—replace up to half of the flour with whole wheat for a denser, earthier loaf.
2. What if I don’t have a Dutch oven?
Use any heavy, oven-safe pot with a lid or bake on a tray with a small pan of water in the oven for steam.
3. Can I add cheese?
Absolutely—shredded Parmesan or sharp cheddar go great in this dough.
4. Can I make it faster?
Use more yeast (1 tsp) and let rise 3–4 hours. It won’t have as much depth of flavor, but still tasty.
5. Is this bread vegan?
Yes! This rustic bread contains no dairy or eggs.
Final Thoughts
Rustic No Knead Rosemary Garlic Bread is the kind of recipe that makes you feel like a professional baker without all the effort. With its crisp crust, tender center, and herby garlic flavor, it’s the perfect complement to almost any meal. Just mix, rise, and bake your way to homemade bread bliss!
Try it out and let me know what you think! Don’t forget to leave a review below and share your photos on Pinterest! I can’t wait to see your rustic bread creations.
Preparation Time: 10 minutes (plus rise time)
Baking Time: 45 minutes
Cuisine: Artisan / Rustic Baking
Nutritional Information (Per Slice – 12 slices):
Calories: 160 | Protein: 4g | Carbohydrates: 28g | Fat: 3g | Fiber: 1g | Sodium: 250mg
Rustic No Knead Rosemary Garlic Bread
- Total Time: 10 minutes
Description
Crusty on the outside, soft and chewy on the inside, this Rustic No Knead Rosemary Garlic Bread is a simple artisan-style loaf that packs big flavor with minimal effort. Infused with fresh rosemary and roasted garlic, it’s perfect for dipping, pairing with soups, or making the best sandwich of your life. And the best part? No kneading required—just mix, rest, and bake!
Want recipes like this delivered straight to your inbox? Subscribe now to get the latest culinary creations you’ll love.
Ingredients
-
3 cups all-purpose flour
-
1 ½ tsp salt
-
½ tsp instant yeast
-
1 ½ cups warm water
-
1 tbsp olive oil
-
2 tbsp chopped fresh rosemary (or 1 tbsp dried)
-
5 cloves roasted garlic, mashed (or 2 raw cloves, minced)
-
Extra flour for dusting
-
Cornmeal or parchment for lining the baking surface
Instructions
Step 1: Mix the Dough
-
In a large bowl, combine flour, salt, and instant yeast.
-
Stir in chopped rosemary and roasted garlic.
-
Add warm water and olive oil, then stir with a spoon until a shaggy, sticky dough forms.
-
Cover the bowl with plastic wrap or a towel and let it rise at room temperature for 12 to 18 hours, or until doubled in size and bubbly.
Step 2: Shape and Rest
-
Flour your hands and a clean surface. Gently turn the dough out and fold it over a couple of times to shape into a rough ball.
-
Place the dough onto a piece of parchment paper. Cover with a towel and let it rest for 30 to 60 minutes.
-
Meanwhile, place your Dutch oven into the oven and preheat to 450°F (232°C).
Step 3: Bake the Bread
-
Carefully remove the hot Dutch oven from the oven.
-
Lift the dough using the parchment and place it inside the Dutch oven.
-
Cover with lid and bake for 30 minutes.
-
Remove lid and bake another 10–15 minutes until golden brown and crusty.
Step 4: Cool and Serve
-
Remove the bread and let it cool on a wire rack for at least 20 minutes before slicing.
-
Enjoy warm or room temperature with butter, olive oil, or your favorite toppings.
Notes
Use Roasted Garlic – Adds sweet, mellow depth (just roast whole heads wrapped in foil at 400°F for 35–40 minutes).
Let the Dough Rest – The longer rise creates better flavor and texture.
Use a Dutch Oven – Traps steam to create that iconic crispy crust.
Dust with Cornmeal – Prevents sticking and adds a rustic finish.
Slice When Cool – Slicing too early can cause a gummy texture.
- Prep Time: 10 minutes (plus rise time)
- Cuisine: Artisan / Rustic Baking