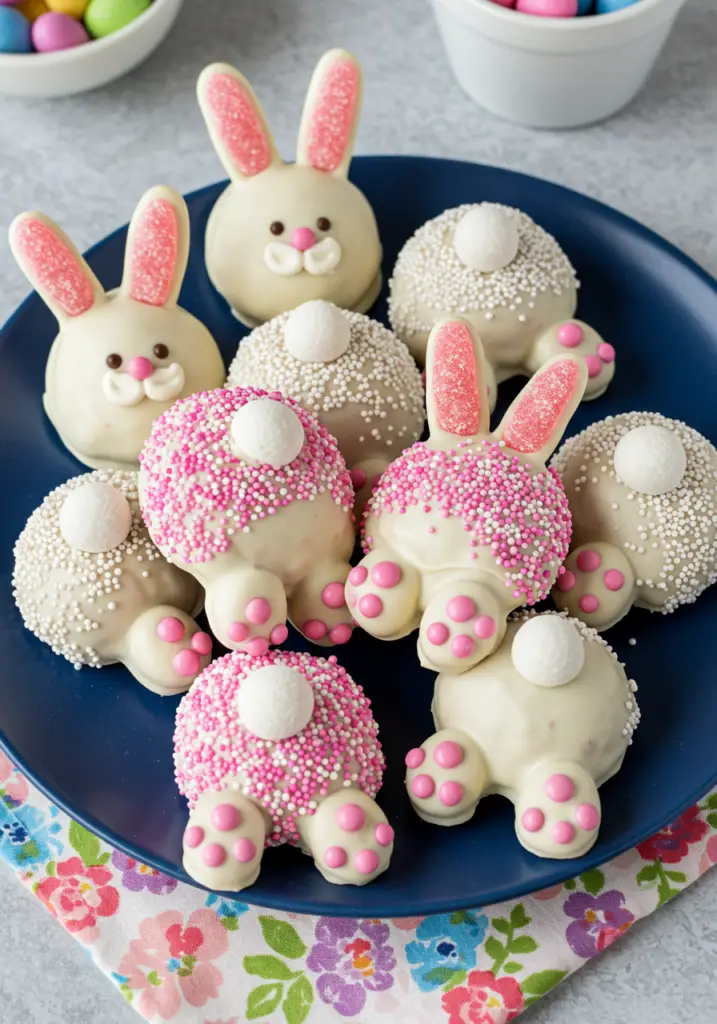
Looking for a cute, festive treat that’s as delicious as it is fun to make? These Bunny Butt Oreo Balls are the perfect no-bake Easter dessert! Made with crushed Oreos and cream cheese, dipped in white chocolate, and decorated to look like little bunny bottoms—complete with mini marshmallow tails and candy feet—this treat will be the star of your spring celebration.
Want recipes like this delivered straight to your inbox? Subscribe now to get the latest culinary creations you’ll love.
Why You’ll Love This Recipe
No-Bake Fun – Perfect for kids and adults to make together.
Adorably Delicious – Sweet, creamy, and decorated to impress.
Only a Few Ingredients – You likely have most on hand already.
Great for Holidays – A charming addition to any Easter dessert table.
Make-Ahead Friendly – Can be stored in the fridge or freezer.
Ingredients You’ll Need
For the Oreo Balls:
- 1 package (14.3 oz) Oreo cookies (regular, not Double Stuf)
- 1 (8 oz) block cream cheese, softened
- 1 tsp vanilla extract (optional)
For the Coating & Decoration:
- 12 oz white melting chocolate or almond bark
- Pink candy melts or pink gel icing (for paw pads)
- Mini marshmallows (for tails)
- White candy melts or white chocolate chips (for feet)
- Optional: Sprinkles or shredded coconut (for decoration)
Tools You’ll Need
- Food processor or zip-top bag & rolling pin
- Mixing bowl
- Baking sheet
- Parchment or wax paper
- Microwave-safe bowls
- Toothpicks or skewers
- Small piping bag or zip-top bag (for decorating)
Step-by-Step Instructions
Step 1: Crush the Oreos
Place the Oreos (including the filling) in a food processor.
Pulse until they become fine crumbs.
Alternatively, place in a zip-top bag and crush with a rolling pin.
Step 2: Mix the Oreo Filling
In a mixing bowl, combine the crushed Oreos with softened cream cheese.
Add vanilla extract if using.
Mix thoroughly until a thick, sticky dough forms.
Step 3: Shape the Balls
Roll the mixture into 1-inch balls and place them on a parchment-lined baking sheet.
Chill in the freezer for 15–20 minutes to firm up.
Step 4: Melt the White Chocolate
In a microwave-safe bowl, melt the white chocolate in 20-second intervals, stirring each time, until smooth.
Step 5: Dip the Balls
Using a fork or toothpick, dip each Oreo ball into the melted white chocolate and coat fully.
Tap off excess chocolate and place back on the parchment paper.
Step 6: Create the Bunny Butt
Before the coating sets, press a mini marshmallow on top (for the tail).
Use white candy melts to form small oval feet—flatten slightly and attach to the bottom of the ball.
Let the chocolate set completely (you can speed this up in the fridge).
Step 7: Decorate the Feet
Melt pink candy melts or prepare a pink icing.
Use a piping bag or toothpick to draw paw pads and toes on each bunny foot.
Let everything dry completely before serving.
Tips for Success
Use Room Temperature Cream Cheese – Easier to blend smoothly.
Chill Before Dipping – Helps the balls hold their shape when coating.
Work Quickly – White chocolate sets fast, so decorate immediately.
Use Food Tweezers – For easy candy foot placement.
Let Kids Help – Shaping and decorating is a fun family activity!
Serving Suggestions
Easter Dessert Platter – Display with pastel candies, cookies, and cupcakes.
Gift Boxes – Pack in mini cupcake liners and place in a gift box for a cute homemade treat.
Easter Egg Hunts – Wrap individually in treat bags for post-hunt rewards.
Cake Toppers – Place a few on top of a frosted cake for extra cuteness.
How to Store & Freeze
Storing:
- Refrigerator: Store in an airtight container for up to 1 week.
Freezing:
- Freeze for up to 2 months. Thaw in the fridge before serving.
Make-Ahead Tip:
You can prep the Oreo balls and freeze them before dipping and decorating.
Frequently Asked Questions
1. Can I use a different flavor of Oreo?
Yes! Golden Oreos, mint, or peanut butter flavors work well too.
2. What if I don’t have a food processor?
Use a sealed bag and rolling pin to crush the cookies into fine crumbs.
3. Can I use candy coating instead of chocolate?
Absolutely. Candy melts or almond bark are easier to work with and set quickly.
4. How do I make the feet stick?
Use a dot of melted chocolate to attach the feet to the base of the coated ball.
5. Can I make these dairy-free?
Use dairy-free cream cheese and chocolate alternatives—several great options are available.
Final Thoughts
Bunny Butt Oreo Balls are the ultimate combination of adorable and delicious. With their rich Oreo-cream cheese centers, crisp white chocolate coating, and fun decorations, they’re a guaranteed hit at any spring or Easter event. These no-bake treats are easy to make and even easier to love!
Make them once, and you’ll want to bring them out every year. Don’t forget to share your bunny creations—I can’t wait to see your versions!
Preparation Time: 25 minutes
Chill Time: 20 minutes
Cuisine: American
Nutritional Information (Per Ball):
Calories: 160 | Protein: 2g | Carbohydrates: 17g | Fat: 10g | Fiber: 1g | Sodium: 85mg

Bunny Butt Oreo Balls
- Total Time: 45 minutes
Description
Looking for a cute, festive treat that’s as delicious as it is fun to make? These Bunny Butt Oreo Balls are the perfect no-bake Easter dessert! Made with crushed Oreos and cream cheese, dipped in white chocolate, and decorated to look like little bunny bottoms—complete with mini marshmallow tails and candy feet—this treat will be the star of your spring celebration.
Want recipes like this delivered straight to your inbox? Subscribe now to get the latest culinary creations you’ll love.
Ingredients
For the Oreo Balls:
-
1 package (14.3 oz) Oreo cookies (regular, not Double Stuf)
-
1 (8 oz) block cream cheese, softened
-
1 tsp vanilla extract (optional)
For the Coating & Decoration:
-
12 oz white melting chocolate or almond bark
-
Pink candy melts or pink gel icing (for paw pads)
-
Mini marshmallows (for tails)
-
White candy melts or white chocolate chips (for feet)
-
Optional: Sprinkles or shredded coconut (for decoration)
Instructions
Step 1: Crush the Oreos
Place the Oreos (including the filling) in a food processor.
Pulse until they become fine crumbs.
Alternatively, place in a zip-top bag and crush with a rolling pin.
Step 2: Mix the Oreo Filling
In a mixing bowl, combine the crushed Oreos with softened cream cheese.
Add vanilla extract if using.
Mix thoroughly until a thick, sticky dough forms.
Step 3: Shape the Balls
Roll the mixture into 1-inch balls and place them on a parchment-lined baking sheet.
Chill in the freezer for 15–20 minutes to firm up.
Step 4: Melt the White Chocolate
In a microwave-safe bowl, melt the white chocolate in 20-second intervals, stirring each time, until smooth.
Step 5: Dip the Balls
Using a fork or toothpick, dip each Oreo ball into the melted white chocolate and coat fully.
Tap off excess chocolate and place back on the parchment paper.
Step 6: Create the Bunny Butt
Before the coating sets, press a mini marshmallow on top (for the tail).
Use white candy melts to form small oval feet—flatten slightly and attach to the bottom of the ball.
Let the chocolate set completely (you can speed this up in the fridge).
Step 7: Decorate the Feet
Melt pink candy melts or prepare a pink icing.
Use a piping bag or toothpick to draw paw pads and toes on each bunny foot.
Let everything dry completely before serving.
Notes
- Use Room Temperature Cream Cheese – Easier to blend smoothly.
- Chill Before Dipping – Helps the balls hold their shape when coating.
- Work Quickly – White chocolate sets fast, so decorate immediately.
- Use Food Tweezers – For easy candy foot placement.
- Let Kids Help – Shaping and decorating is a fun family activity!
- Prep Time: 25 minutes
- Chill Time:: 20 minutes
- Cuisine: American